

Making Your Own Yoga Block
 For those who like to do it yourself, why not make your own yoga block? In my last post I reviewed the best yoga blocks you can purchase and indeed those are some very good blocks but you will find that you can also create your own yoga blocks in a few simple steps.
Materials You Can Use to Make Your Own Yoga Block
You can make a variety of yoga blocks from many different materials such as:
- Cardboard boxes
- Old phone books (I bet you have some still lying around)
- Old encyclopedias or other large hardcover books
- Old large soft cover books like SAT study guides, old car manuals, etc.
- Duct tape (oh yeah, we will be using duct tape)
- Shoe boxes and paper sacks
- Empty shampoo or lotion bottles 32 oz or greater
- Empty protein powder or food cylindrical container, the larger the better
You will notice I did not mention things like wood or cork or foam. If you have chunks of wood around your home and if you also have the woodworking tools and know-how to use them then by all means, saw off a 9x6x4 inch chunk of wood, sand it, varnish it and tada – now you have a yoga block. What I am about to lead you through is how to make a very useful object out of things you probably have around your home and are not using anymore and we will be doing this without the use of whirling saw blades. In other words, reducing clutter, re-purposing items and avoiding potential maiming – I think that is something we can all get behind. You will however want a measuring device (tape measure, ruler, or yardstick will do), a marker and scissors or a utility knife.
Making a Yoga Block from Cardboard Boxes
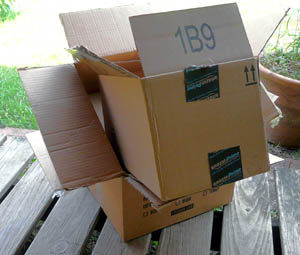 Today I wanted to create a block using cardboard. These days if you don’t have a bunch of cardboard boxes lying around from something that got delivered to you then you are probably not participating in the wonders of online shopping. Since you are reading this online I will assume that like me, you have several boxes lurking around. This project will turn those boxes into more than just the empty reminders of your participation in e-commerce.
I had found an excellent guide to making a rectangular yoga block by Mary Ann Mierau on her blog Thingerling, and she inspired me to create my own version. Instead of creating a rectangular block I decided to create an oval block.
You will need – several cardboard boxes, a ruler, a marker, scissors or a utility knife and duct tape.
DIY Oval Yoga BLock
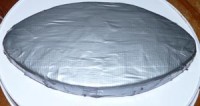
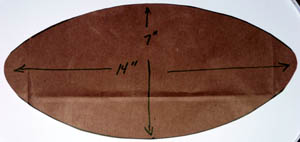 – Step One – First, create a template for you oval block. I chose to make mine 14 inches long by 7 inches high. I used a paper sack and marked out the length and then the middle height. To create the smooth arch of the oval I used a large serving tray, placing its edges across my length marks and height marks. I then rounded the ends somewhat to get the shape I wanted.
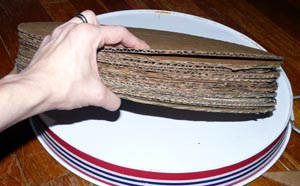 – Step Two – Using this template I then marked my cardboard. I used the paper template just for the first oval and cut that one out to use as a template for all the others. The cardboard made it easier to mark the shapes. It took me a little bit of thought to come up with a way to mark the cardboard in order to get a maximum amount of ovals from each rectangular box. Don’t worry about creases, just try to make the creases happen at different parts of the oval so when they stack together they won’t all bend the same way.
 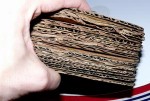 I found that cutting out the shapes was a bit troublesome for scissors and a utility knife worked much better. It took 16 ovals out of two medium sized boxes to make a stack that was 3 inches wide.
– Step Three – Place the stack of ovals together and make the edges even. I did this by rounding the sides of 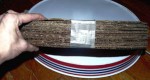 the stack against the floor on the top, bottom and edges, sort of like tapping sheets of paper together to even them out.
 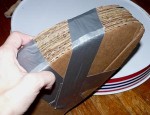 Next I placed a single strip of duct tape around the middle of the stack and then rounded the sides against the floor again. Once all the sides were even I created a cross over of duct tape around each end to secure the structure.
– Step Four –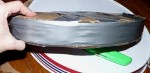 Once you have the ends secure, cover the edges of the block by placing a single length of duct tape around the rough ends. Next use sequential pieces of duct tape across the edge and onto either side. Don’t worry about complete coverage with these.
 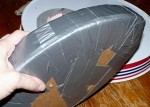 Once you have all the rough edges completely covered then use lengths of duct tape across the long edges of the oval block to cover the rest of the cardboard.
– Step Five – Now you can add your finishing touches, which for me was to brighten the block up with colorful duct tape in stripes. I put the duct tape along the length first, letting the ends come onto the edges. I then wrapped a single piece of duct tape around the entire edge to smooth out the look.
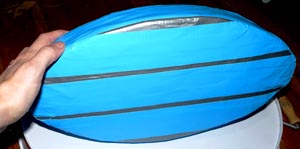
Tada! You can personalize your block with many different colors of duct tape. 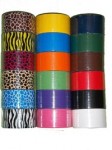

Love it! I bought a wooden dowel from home depot today, as well as a few blocks of wood that I’m going to hammer together for a make-shift block. Great info here, so much more economical and pure to the yogic philosophy 🙂
Warmly,
Mel
Hi Mel,
I have been loving my home-grown block and now I am eyeing all sorts of other things in the house as future yoga props. I would love to see your block when you get it finished. Post a pic if you can.
Thanks,
Julie