

Yoga Pose Spotlight: Triangle pose
 Today I wanted to talk about one of the traditional Hatha yoga poses known as Triangle or Trikonasana. This pose is excellent for beginners as it is easy to adapt for all levels of flexibility and has just a few simple steps to create the pose. It is also an excellent pose for experienced yogis as there are many adaptations and adjustments possible. The pose is great for helping to release back tension, creating an elongated spine and releasing hamstring tension.
Sometimes the best way for us to understand our journey in yoga is to come back to simple poses and observe or progress. Some of the greatest challenges I offer to my advanced students is rediscovering a simple pose with a strict adherence to proper alignment. We often find that a pose we thought we had mastered is actually a pose that is ready for a new layer of polish. Yoga is filled with the potential of turning something old into something new again.
Here is the basic triangle pose instruction:
- Stand at the front of your mat with your feet hip distance wide. Your hip distance is found by finding the bony prominences at the front of your pelvis and placing your feet in line with these areas.
- Step you right foot back a comfortable distance. How far you step back depends on flexibility, familiarity with the pose and leg length. Make sure you have your feet hip distance wide. If you make your feet narrow, like standing on a tight rope, you will disrupt your balance and limit your flexibility. It is better to have your right foot closer to the right edge of the mat and the left foot nearer the left edge of the mat.
- Turn your right foot (back foot) 45 degrees, instead of pointing straight forward or straight out to the side. Press this foot evenly into the floor so that you maintain a proper arch in the foot.
- Face the front of your mat. Place both hands on your hips. Lift your chest upward to lengthen your spine. Tighten you thighs so that the muscles between your knees and your hips become firm and your knee caps pull upward. Keep your knees straight.
- Breathing deeply and keeping your spine long and your thighs tight, bend slowly forward toward your left leg (front leg). Bend only through your hips so that your back remains long without rounding. Stop bending forward when you feel slight stretch in the back of your left (front) leg. Avoid bending too far and creating too much stretch sensation.
- Place both of your hands on your left (front) leg somewhere on your thigh between your hip and your knee cap.
- Keep your thighs tight and reach your chest away from your hips. Keep your spine long and your low back toward your navel so that you are not rounding your back. Look toward the floor and keep your neck relaxed. Breathe deeply.
- Slowly begin to lift your right shoulder above your left shoulder, placing your right hand on your right hip. Your left hand will remain on your left leg. Keep your neck comfortable by looking at the floor or out to the side. Breathe deeply.
- Continue to lengthen your spine by moving your left shoulder away from your hips. Gradually stretch your right arm upward toward the ceiling and gently lift upward to decompress your chest. Breathe deeply.
- Come out of the pose by lifting strongly through your right arm to lift your chest upward until your chest is upright. Now turn your chest forward toward the front of the mat and step forward while bringing your right arm beside you.
You will then repeat the above process for the opposite side.
Options for beginners and those with limited flexibility:
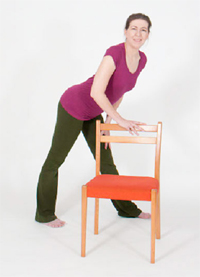
- Place a chair beside you so that as you bend you can place your hands on the back or seat of the chair for support. This can help with those who find this pose challenging to balance or find they have trouble bending forward.
- Stand beside a wall and make the leg farthest away from the wall the one you step backward. This will give you support to your back when you lift your shoulder up in the twist.
- Step back very little and bend forward only slightly. All sensations of stretch should be mild and pleasant.
Options for advanced students:
- Keep your spine very long without rounding. You may need to limit your forward bend in this pose in order to keep your spine appropriately long.
- As you lift your upper arm, work to keep both shoulders aligned as if your back is to a wall with one shoulder directly above the other shoulder. Both of your shoulders should be aligned with your hips. If you have trouble knowing whether you are aligned, you can stand near a wall with your outer leg as the back leg. That way the bottom shoulder will be near the wall and you can then bring the upper shoulder near the wall as well.
- Use a block near your front leg to allow you to remain in a less intense pose as you work to align the pose properly. Remember, you do not win awards or ribbons by being able to touch the floor. Your goal is to create an optimal body by aligning your pose properly.
For all students, breathe deeply throughout the pose. Come out of the pose when you feel fatigued. It is better to repeat the pose several times instead of holding the pose for a long time. A well done pose feels great. Avoid intense stretches as this causes muscles to tighten instead of lengthen.

Hi! Useful article!.