A Mini-Ball with a Big Benefit
 There are big physioballs that you can sit on. There are medicine balls that offer weight training benefits. There is also this mini-ball that can offer what the other two do not – Weightless resistance, stability challenge and core training – all in a small and easy to manage size.
I first ran across these when I was searching for a way to provide initial resistance training for someone just starting their recuperation from an injury. When our body is first on the road to recovery, too much challenge to injured muscles can set us back and create re-injury. Often it is best to provide isometric contraction to the muscles as a first step to enhancing strength. An isometric contraction is one where the muscle contracts but remains the same length, or in other words we tense the muscle but we don’t move the joint.
 Another term for isometric contraction is dynamic tension. The major difference between recuperative isometric contractions and dynamic tension exercises is the starting point of the participant. This description was coined by none other than Charles Altas, who some will remember as popularizing exercise techniques designed to help the “97 pound weakling” who got sand kicked in his face at the beach. His book ‘Ten Steps to a Better Body’ is still around today and contains some interesting exercise tips for using dynamic tension to enhance muscle strength.
So the concept of creating resistance with the desire to limit movement is not a new one, but it certainly is a helpful one for those wanting to become stronger no matter the starting point. I have found though that the use of a small inflatable ball for these type of exercises to be invaluable for several reasons. The first reason would be the small size of the ball. Coming in at 9 inches when inflated, the balls do not take up a lot of space. They also weight practically nothing, so you don’t have to worry about dropping them on your toe. They deflate and inflate very easily which makes the ideal for travel. Best of all though, they are one of the best received exercises devices I have ever run across.
The best way to describe a mini-ball is soft. I purposefully inflate mine so that you can easily compress the sides. This along with the soft texture of the ball invites you to squeeze them. And that is exactly what a first time user of the ball will do when they get it into their hands; they will squeeze it and a look of interest and amusement will come over their face. Oddly enough, the second thing that happens most often when a newcomer takes hold of the ball is that they will mash it against their head. Nope, I don’t know why that is, but I can tell you that my experience with working with groups of people it is a common occurrence. People like them, they like that the ball is soft and they like to squeeze it.
This opens the way to all sorts of exercises that can help us increase our strength and have fun while doing it. Here is one of my favorite mini-ball resistance exercises: (Make sure to do nothing that causes you discomfort)
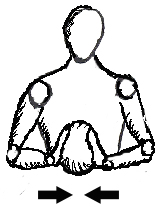
- Start by sitting or standing with good posture and a mini-ball between your hands.
- Press your hands together, squeezing the ball firmly as you exhale. You will feel your chest muscles contract as you do this.
- Now reposition your hands in these places and repeat the press:
- 1. Higher than your shoulders.
2. Forward and away from your body.
3. Close to your left shoulder.
4. Close to your right shoulder.
5. Below your waist level. - Each time you squeeze your hands, exhale slowly.
- If you are comfortable, then start pressing your hands close to your chest and as you squeeze, move your pressing palms in a circle, up, out, down and back to where it started. Keep breathing as you move and keep the pressure on your palms.
- Reverse the direction of the circle.
- Now start with pressed palms close to your left shoulder and as you squeeze, move your palms in a circle, up, across to your right, down and back to the left shoulder. Keep breathing as you move and keep the pressure on your palms.
- Reverse the direction of the circle.
You could do the above exercise with a pillow or block, or even your own palms pressed together, but the best and most pleasant way to do it is with a mini-ball.

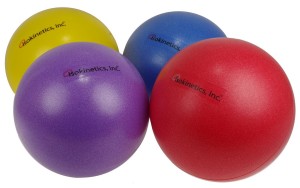 Gymnic is no longer the only company to make mini-balls and you can possibly find some version at a local sporting good store. I have never found the Gymnic Overball anywhere locally. Online, I found another mini-ball from Isokinetics that looks equally as good as the Overball, but is less expensive. It seems to come in four different colors. They also advertise a soft feel but it looks smooth rather than the textured covering of the Overball. I plan on ordering these in the next few weeks to increase my mini-ball stock. You can never have too many of these balls around.
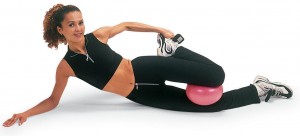
If you think you would like one, I recommend getting at least two mini-balls. They are delightful in a way that I can not say about any other exercise equipment and the variety of exercises you can do with them is extensive. Squeeze them between your hands, between your knees or between your arm and chest and you have a great isometric strengthening exercise. Place them between your knees to help you maintain hip distance spacing. Use them to support your knee when in side lying exercises. Mash them against your head. It’s all good.